The Enduring Charm of Easy Hello Dolly Bars: Whip Up Magic Cookies in 30 Minutes
There are some desserts that transcend generations, evoking warmth and nostalgia with every bite. Among them, the beloved Hello Dolly Bar stands out as a true culinary icon. Known by many delightful names – from Seven-Layer Bars and Magic Bars to even the whimsical Dolly Parton Bars – these gooey, chewy, and utterly irresistible cookie bars promise a slice of pure comfort. And the best part? You can whisk up this magical dessert from scratch in just about 30 minutes, making it the perfect impromptu treat or a quick-fix for unexpected guests.
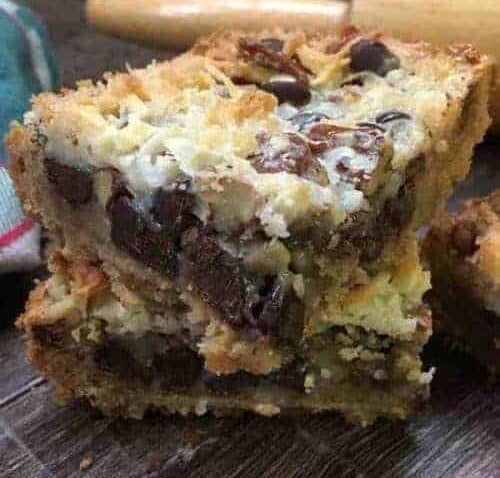
Imagine sinking your teeth into a rich tapestry of textures and flavors: a buttery graham cracker crust providing a sturdy base, followed by generous layers of melted chocolate, toasted nuts, sweet coconut, all bound together by the luscious, caramelized embrace of sweetened condensed milk. It’s a symphony for the senses, delivering that satisfying sweetness without being cloyingly rich. Whether you're a seasoned baker or a complete novice, our comprehensive guide to the classic
hello dolly bars recipe will empower you to create these legendary treats with effortless grace.
Unveiling the Magic: Essential Ingredients for Perfect Hello Dolly Bars
The genius of Hello Dolly Bars lies in their simplicity and the harmonious interplay of a few key ingredients. Each component plays a vital role in creating that signature gooey, chewy texture and rich flavor profile. Let's break down what you'll need and some tips for selecting the best:
- Graham Cracker Crumbs & Melted Butter: The Foundation
The bedrock of these bars is a simple yet effective graham cracker crust. Finely crushed graham crackers, mixed with melted butter, create a firm, slightly sweet base that perfectly complements the rich layers above. While store-bought crumbs are convenient, you can easily make your own by pulsing graham crackers in a food processor. Ensure the butter is fully melted and thoroughly mixed with the crumbs for an even, pressable crust.
- Sweetened Condensed Milk: The Binding Elixir
This is truly the "magic" ingredient that transforms a collection of toppings into a cohesive, chewy bar. As it bakes, sweetened condensed milk thickens, caramelizes, and binds all the layers together, imparting a wonderfully rich, toffee-like flavor and a moist, tender texture. A standard 14-ounce can is usually sufficient, but if you're feeling adventurous, homemade sweetened condensed milk can elevate the flavor even further.
- Chocolate Chips: The Melty Delight
Semi-sweet chocolate chips are the traditional choice, striking a perfect balance that isn't overly sweet, allowing other flavors to shine. However, feel free to explore! Milk chocolate chips offer a creamier, sweeter profile, while dark chocolate chips provide a deeper, more intense cocoa note. For those who love a nostalgic touch, butterscotch chips are a fantastic addition, creating a distinctively rich flavor. You can even mix and match for a more complex chocolate experience!
- Shredded Coconut: The Chewy Texture
Sweetened shredded coconut adds a delightful chewiness and a subtle tropical sweetness that pairs beautifully with the chocolate and nuts. Its delicate texture contributes significantly to the overall mouthfeel of the bars. If you're not a huge fan of coconut, you can explore variations, but for the classic recipe, it's an indispensable layer.
- Pecans or Walnuts: The Nutty Crunch
Nuts provide a welcome textural contrast and a rich, earthy flavor that cuts through the sweetness. Pecans and walnuts are the most common choices, offering a buttery crunch. For an extra layer of flavor, lightly toast your chopped nuts before adding them to the bars. If you're serving a crowd or are unsure about nut allergies, feel free to omit them entirely, or offer a separate nut-free batch. Chopped peanuts can also be a delightful alternative, especially if you're leaning towards a peanut-butter inspired version.
Crafting Your Own Culinary Delight: Step-by-Step Hello Dolly Bars Recipe Guide
The beauty of the
hello dolly bars recipe lies in its straightforward assembly. There's no complex mixing or delicate folding – just simple layering and baking. Here's how you'll whip up these magical cookies in under 30 minutes of active time:
- Preheat and Prepare: Start by preheating your oven to 350°F (175°C). Line a 9x13-inch baking pan with parchment paper, leaving an overhang on the sides. This thoughtful step will make lifting the cooled bars out of the pan incredibly easy, ensuring clean cuts. Lightly grease the parchment paper for extra insurance against sticking.
- Form the Crust: In a medium bowl, combine 1 ½ cups of graham cracker crumbs with ½ cup (1 stick) of melted unsalted butter. Mix thoroughly until the crumbs are evenly moistened. Press this mixture firmly and evenly into the bottom of your prepared baking pan. Using the bottom of a glass or a flat measuring cup can help create a compact, uniform crust.
- Layer the Goodness: Now comes the fun part – layering! Evenly sprinkle the following ingredients over the graham cracker crust, in this order:
- 1 cup chocolate chips (semi-sweet, milk, dark, or a mix)
- 1 cup shredded sweetened coconut
- 1 cup chopped pecans or walnuts
The order of these layers isn't super strict, but placing the smaller, lighter ingredients like chocolate and coconut directly on the crust, with the nuts on top, helps prevent them from sinking too much.
- Pour the Magic: Carefully and evenly pour one 14-ounce can of sweetened condensed milk over all the layers. Try to cover as much of the surface as possible. The milk will seep down and bind everything together during baking.
- Bake to Perfection: Place the pan in your preheated oven and bake for 20-25 minutes, or until the edges are golden brown and the filling is bubbly and set. The top layers, especially the coconut, should be lightly toasted. Avoid over-baking, as this can make the bars too hard; you want that signature gooey center.
- Cool and Chill: This step is crucial for perfectly structured bars. Remove the pan from the oven and let it cool completely on a wire rack at room temperature. Once cooled, transfer the pan to the refrigerator and chill for at least 2 hours, or ideally, overnight. Chilling helps the condensed milk filling firm up, making the bars much easier to cut into neat squares. Don't skip this part if you want clean, beautiful slices!
- Slice and Serve: Once thoroughly chilled, use the parchment paper overhang to lift the entire slab of bars out of the pan. Place them on a cutting board and use a sharp, warm knife (wiping it clean between cuts) to slice them into squares or rectangles of your desired size.
Elevate Your Hello Dolly Bars: Customization and Serving Ideas
One of the most appealing aspects of Hello Dolly Bars is their incredible versatility. While the classic recipe is undeniably delicious, it also serves as a fantastic canvas for your culinary creativity. You can effortlessly adapt this recipe to suit different tastes, dietary needs, or simply to use what you have on hand. For even more detailed ideas and expert tips on personalizing your batch, be sure to check out our dedicated guide on
Customize Your Hello Dolly Bars: Perfect Variations & Tips.
Here are some popular variations and serving suggestions to inspire you:
*
Double Chocolate Delight: If you're a serious chocolate lover, swap out the nuts or a portion of the coconut for an extra type of chocolate! Use a mix of dark and milk chocolate chips, or even throw in some white chocolate chunks for a triple threat.
*
Nut-Free Zone: Easily omit the nuts for those with allergies or preferences. You can compensate by adding extra chocolate chips or coconut, or introduce other fun toppings like pretzel pieces for a salty crunch.
*
Fruity Twist: Incorporate dried fruits like cranberries, chopped dried apricots, or golden raisins for a burst of chewy, tangy sweetness.
*
Candy Bar Inspiration: Crush up your favorite candy bars (like toffee bits, mini peanut butter cups, or chopped caramels) and sprinkle them over the layers before baking.
*
Salty-Sweet Sensation: A sprinkle of sea salt flakes over the finished bars just after baking can enhance all the sweet flavors and add a sophisticated touch.
*
Spice it Up: A pinch of cinnamon or a tiny dash of nutmeg in the graham cracker crust can add a warm, comforting aroma, especially during the colder months.
These bars are not only incredibly easy to make but also store beautifully, making them ideal for meal prep, entertaining, or gifting.
*
Make-Ahead Marvel: Hello Dolly Bars are perfect for preparing in advance. Bake them the day before an event, chill them thoroughly, and then cut them just before serving.
*
Freezer-Friendly: Once baked and cooled, cut the bars into individual portions. Wrap each bar tightly in plastic wrap, then place them in an airtight container or freezer bag. They can be frozen for up to 3 months. Thaw them at room temperature for a quick, delicious treat whenever a craving strikes.
*
Serving Suggestions: These versatile treats are perfect for any occasion. Serve them alongside a cup of hot coffee or tea, include them in lunchboxes for a special surprise, or arrange them on a dessert platter for parties and gatherings. Their portability also makes them excellent for picnics, potlucks, and tailgates.
For more insights into the history and universal appeal of these delightful treats, including why they're known by so many different names across the country, don't miss our article:
Hello Dolly, Magic, 7-Layer: The Gooey Bar Everyone Loves.
Conclusion
The Easy Hello Dolly Bar is more than just a dessert; it's a testament to the magic that can happen with a few simple ingredients and minimal effort. With their irresistibly gooey texture, delightful blend of flavors, and effortless preparation time, these bars are a guaranteed crowd-pleaser for any occasion. From festive holiday gatherings to a quiet afternoon treat, or even a thoughtful food gift for a neighbor, this
hello dolly bars recipe is a keeper. So, roll up your sleeves, gather your ingredients, and get ready to whip up a batch of these truly magical cookies – you'll be glad you did!